Search Results for mtc2

Mugen MTC2 & Tamiya TRF420 Summer Testing

As regular readers will know, I have no local asphalt track suitable for the 4WD ISTC class touring cars, at least not with Pro Stock or Modified power levels – a fact that complicates matters when it comes to running these cars. I always try to get in at least a couple of full days of testing though, even if that requires some travelling and careful studying of weather reports and such beforehand. These last two summers have of course been a bit extra special, as everyone all over the world will know, but just like last summer I still managed some good test days.

The main focus for this summer’s TC testing was on the Mugen MTC2, which I got and built when it was released. In addition to the MTC2, I still have my Tamiya TRF420, which I was super happy with last summer.
All testing this summer was done at the Laukaa track here in Finland – you’ll find a picture of it in this post from last year.

During the test days I did, I always followed a similar plan, in that I did a bit of baseline running with the TRF420 which I know well, and then quite quickly switched over to the MTC2.
Around 70% of my time was spent with the Mugen, which meant that I did no real setup work with the TRF420, which I already had a good setup for from last summer’s testing.

The MTC2 is obviously a very different car. Based on reports and race results I had quite high hopes for it, but it’s fair to say that the first day was a bit of a struggle. Even though I had tried to prepare the car well, I still had some reliability niggles with the car. Those were quite quickly solved though, and since then the car has been fully reliable.
Still, during most of the first test I was struggling with the car quite difficult to drive in the low grip conditions.
I started out with Ronald’s setup from the first ETS race, but had to work my way through various ideas to get the car more comfortable. Some worked, others not, but by the end of testing I was fairly happy with the balance of the car.

Before I did the final test day, Tonisport released this video on things learned with the MTC2 so far, which I found really quite helpful.
I found that changing which mounting positions I used for the motor mount was very effective in altering the balance of the car, and I tried various configurations. Ride height and downstop settings were also critical in getting the car to work for me on that track. Finally I will also mention that moving weight rearwards in the car worked really well for me.
The MTC2 is really quite responsive and you can feel the effect of each change well. With each change, the difference on the clock was not as big as the difference in feeling though.
Even after I made the car feel well setup and and balanced, I was still clearly faster with the TRF420. With clearly I mean a consistent 0.15s difference in best laps, and a couple of seconds over 5 minutes. That came from the fact that the TRF420 felt more comfortable and forgiving, and I felt that it had more grip, making it possible to push that car harder.
Here’s how it looked after the first testday (Mugen times left, TRF420 times right):

At the end of the final day of testing, this is how it looked (TRF420 left, MTC2 right):

As you can see from the times, I managed to be fairly consistent with both cars.
All direct comparisons were obviously done with the same tyre set, power level, gearing, body (Twister) etc. Tyres used for testing both cars were Volante V5T Gold 32R – yes, lucky to still have some of them.
The main two things I take away from this is:
– 1. That the MTC2 being completely different would still require a fair bit more testing.
– 2. That the TRF420 is still a very good car.

A lot of people were quick to dismiss the TRF420 almost as soon as it was launched, saying it was ‘old’ already when it was released, with the trend at that time being everyone going with mid-style TC’s etc. The truth though is that anyone who has put a bit of time into running the TRF420, and finding a setup that suits them, will say that the car is still very good and competitive, even on a very high level of racing.
I guess some will dismiss what I write as Tamiya fanboy stuff. That won’t bother me and please think what you want, but I will say that I paid for both cars, and have no reason to be biased to any side. I’m just reporting what the clock has told me and what I have found so far.

With all that, I’m definitely not saying that the MTC2 is no good, or really judging it in any way, as I feel in no position to do so. Results have already shown how good the car can be. The fact is that with it being so different, I would have to spend a lot more time with it to feel anywhere confident enough to give any strong judgement.
The MTC2 is really quite impressive, with superb overall quality and design. It is however one of the cars which requires more from the driver/mechanic than your typical TC so far. My feeling based on the testing I have done is that it can be very fast when everything is right, but it can also be quite edgy and less forgiving. I also found it curious to note that with the TRF420 I always knew when I was about to do a good laptime, but with the MTC2 I would sometimes be surprised when I heard the laptime (I was using the LapMonitor timing systems that reads out your laptimes when you drive).
In summary I feel like there’s a lot of potential in the MTC2, but at the same time the line between fast and difficult can be quite thin.
Please put these findings into the context of them being on one particular track with these particular tyres, and with a driver of somewhat limited ability 😉
It might be that the car would have behaved very differently on a high-grip track and with different tyres for example.
It will be interesting to follow how the car develops and what the race results over a full season will be.

As I already mentioned, I did not do any real setup development on the TRF420 (as I wanted to use my time to get to know the MTC2), so my time with the car was mostly spent trying some parts, as well as tyres and bodies.
Therefore, the setup I run was the same as last year, found here.
And here you can see the setup I ended up with on the MTC2. Click the image for a PDF.

That’s basically it for TC asphalt testing 2021, and all running I still manage to to will be with the ARC R12FF. Expect an end of season report on that soon as well.
All the TC testing I did with the MTC2 and TRF420 was super enjoyable. Really so much fun to drive cars as good as these on asphalt!
If you have some questions, leave a comment and I will do my best give answers.

Mugen MTC2 Bypass Dampers
Some new option parts for the MTC2 from Mugen Seiki.

A2538 Bypass Shock Case MTC2
The new bypass shock case has an additional oil flow path processed on the lower side inside the shock case, and it works more smoothly when the piston is in the lower position.
By using this in the front, it makes the car smoother when operating at the corner entrance or with less steering angle, and is suitable for carpet and high grip conditions.


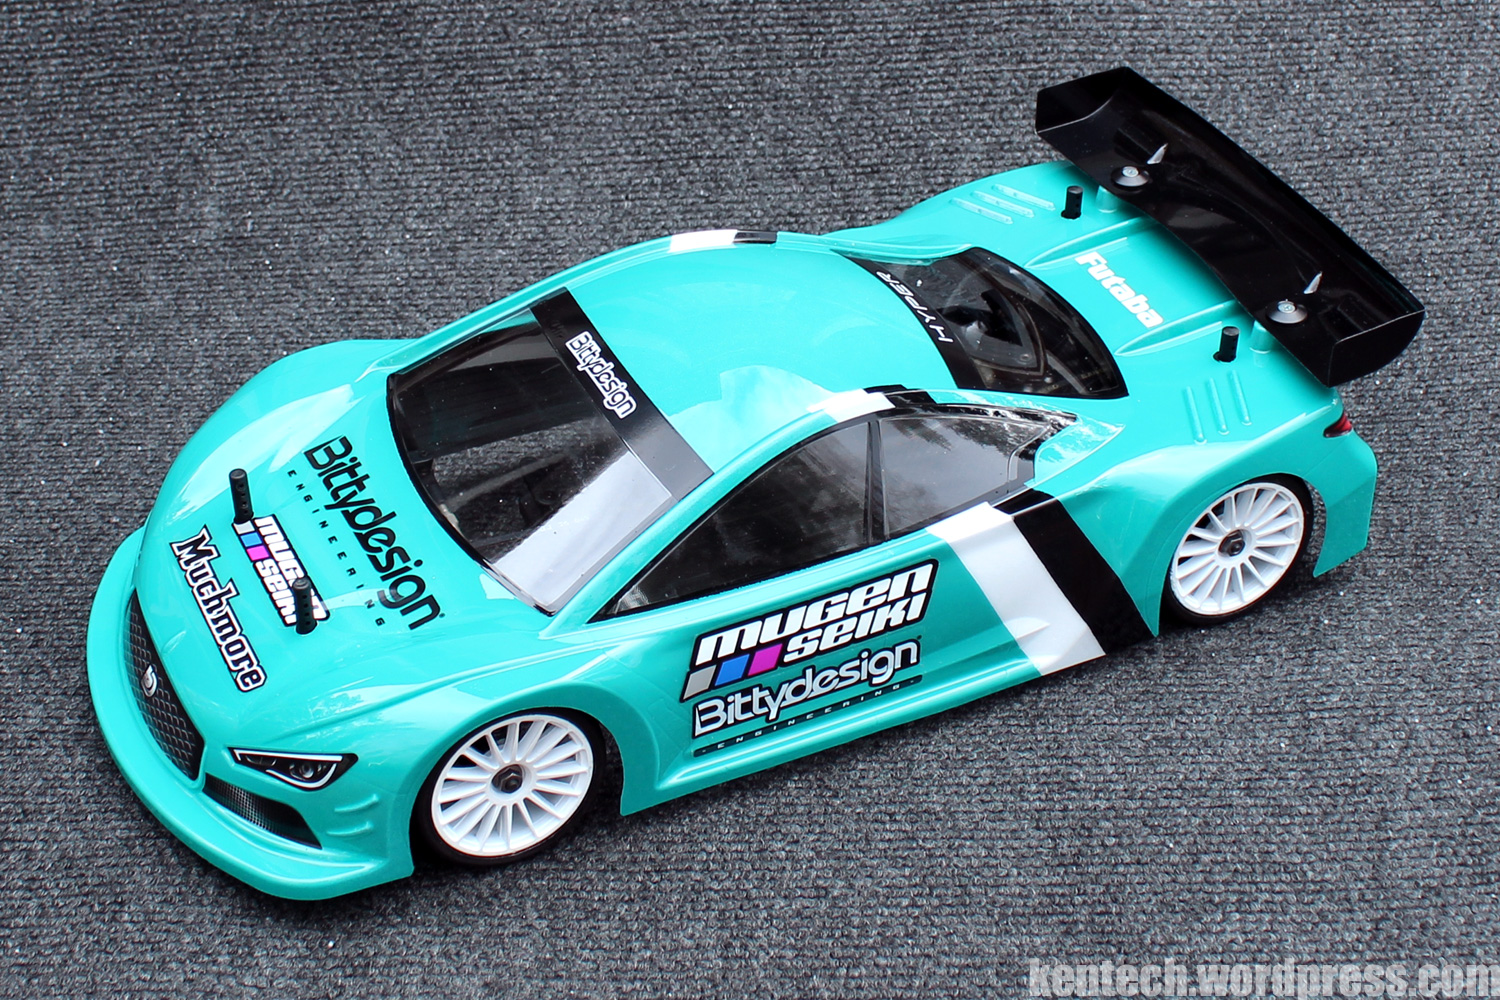
Mugen MTC2 – Bittydesign Hyper
Since I built it, the Mugen MTC2 has been needing a body.
Obviously with no testing scheduled until the weather warms up enough to run outdoors, there has been no rush.
However, as spring is here, and since I had a Bittydesign Hyper body, I decided to do a quick spray can paint for it.

Mugen MTC2 Progressive Springs
Some information on the new Progressive Shock Springs which are now available from Mugen for the MTC2 touring car.
A2539 Progressive Shock Spring 6.5T
A2540 Progressive Shock Spring 7.0T
Compared to the standard springs, by improving the road holding, which improves steering and stability, and reduces posture disturbance due to bumpy road surface. By using A2540 (7.0P) for the front and A2539 (6.5P) for the rear, the car rolls more
smoothly, the accuracy of line taking at the corner entrance is increased, and it is possible to turn witha smaller R. A2540 (7.0P) can be used for both front and rear at the small tracks or with slow motors.


Further Details on the Mugen MTC2
In the presentation of the Mugen Seiki MTC2, published here a couple of days ago (which I also now updated with a few sentences), there were a few things which I had to planned to include but which I had to leave out, as I basically run out of time and wanted to get it posted. In this short post I will return to those points.

One thing which is very obvious with the MTC2, when it’s fully assembled, is how low the car is. This has obviously been a focus of the design, but it still really stands out when you start looking at the car, which can be seen here in these two images.

Next up a few critical weights I did not manage to include in the original presentation of the car.

This is the overall weight of the chassis, built with all standard steel hardware included in the kit, and according to the basic EU carpet carbon chassis setup sheet. No ballast weight on the chassis for this photo.

Weight of one rear corner. When I did the Yokomo BD9 vs Xray T4’19 Double Build a couple of years ago, the T4’19 was 28g and BD9 30g.

And one front corner. On the Mugen MTC1 with the original front end it was 41g, while the MTC1 C-hub version was 39g. BD9 was also 39g, and the T4’19 38g.

Mugen Seiki MTC2 Presentation

Finally it’s time to present the new MTC2 1/10th electric touring car from Mugen Seiki / Mugen Seiki Europe / Mugen Seiki Racing USA.
The MTC2 was announced in August 2020, scheduled for release a few months later, but with the world being a tricky place in 2020 and ’21, things got delayed. The first customers got their cars late December in Japan, while Europe and USA had to wait until early January before the cars were ready to ship out.
Since the car was first launched, the interest in the MTC2 has been huge, most likely thanks to its fairly unique design, coupled with the fact that Mugen cars are well-known for their excellent quality. That Mugen managed to sign Ronald Völker to drive the car will not have lessened the interest either…
The MTC2 is Mugen’s second electric touring car, with their first try, the MTC1 already impressing especially with its quality. The problem with the MTC1 though was that it never really fully convinced on track. I say this from personal experience, and based on the lack of consistently great racing results with it.
The MTC2 is a completely new blank-sheet-of-paper design though, and it certainly looks promising. How few the carry-over parts from the predecessor are on this car is really quite amazing, and very noticeable when you have built both cars.
In the end though, just like with the MTC1 and every other racing car, only the track will tell how good it really is.
For now though, let’s indulge in some beautiful 1/10 TC engineering… 🙂

The car is delivered in this typical 1/10 TC size cardboard box – but with a beautiful design in my eyes. I always liked green.

No cheap “please download the manual” ways with this car, as full printed documentation is provided in the form of a 28 page manual, parts list, kit bag details sheet, option parts list, four different setup sheets, as well as a large set of Mugen Seiki decals.
The manual itself is not the clearest or easiest to read, but contains the necessary information, so you just need to take your time reading it.

The MTC2 is sold either as a carbon or aluminium chassis version – as you can see I got the carbon version.
The chassis is cut from 2.25mm carbon fibre, is 84mm wide, and weighs 66g. A unique feature of the carbon chassis is that it is machined down 0,25mm where the motor mount, bulkheads, suspension and steering attaches to. This means that there is no difference in these critical mounting heights between the carbon and alu chassis (which is 2.0mm thick).
If you look close to the middle of the chassis, you see 5 small holes close to each other on both sides. These can be used to easily check the weight balance of the car. See here for more information. A very neat solution.

The build of the MTC2 starts with the turnbuckles – boring, but I guess good to get them out of the way, and there are fewer of them on this car than most. Aluminium turnbuckles are included.
Next up it’s time to start assembling the lower suspension arms. These are cut from 3.0mm carbon fibre, and on their own they weigh 3.8g each.

The suspension arms are no longer mounted to the chassis with hinge pins. Instead they use 6mm balls that go into alu pivot inserts, which then go through the arms, and are secured with special low profile alu nuts. With the nuts you also adjust how tight the insert is, meaning you can adjust them perfectly to minimise play while making sure the arms still move freely.
Special alu tools that fit the inserts and nuts are included. Altogether you are left quite impressed already at this stage.

Next up it’s time to complete the lower arms, with alu lower damper/roll-bar mounts, and alu droop screw holders. The damper mounts are secured with small 2x6mm hex head screws. There is an inner and outer position available, making it possible to adjust the damper pick up point on the arms. The droop screw is a 3x8mm grub screw.

Here you see the completed front (left) and rear (right) arms. As you can see the alu damper mounts are different, with the front dampers needing to be mounted further in to give clearance for the front wheels while turning. The roll bar is mounted together with the damper at the rear, while the front mounts have a separate hole that assures that the front bar is mounted at the same point as the rear bar. Also note that the dampers are mounted significantly below the arms.
The assembled arms weighs 9.6g (front) and 9.5g (rear).
These suspension arms are obviously longer (pivot to pivot) compared to for example on the previous MTC1 car, and there is also a slight difference in the arm length front to rear.

Rear arms on the car, with spacers under the suspension balls used to adjust roll centre.

Front arms on the car. The inner mounting points for these are spaced slightly wider than those for the rear arms.

A special rear chassis stiffener from carbon fibre is also included, and is mounted with special alu nuts, making it easy to add or remove. Obviously you can vary the stiffening effect by removing screws (mounting points).
Mounted here to show the part, but removed later, in case you’re wondering why it’s not seen on later photos in this build.

Continuing the “fully equipped out of the box” theme, two 10g weights and an 18g weight is included with the kit.
The larger weight drops down into a chassis cutout behind the front arms, while there are two different placements for the 10g weights, either beside the larger weight, or even further forward.

Here you see the underside of the larger 18g weight. A 1mm spacer is used when mounted to the chassis.

All four bulkheads on the MTC2 are identical, with a weight of 5.3g each.
The distance between the chassis mounting holes (lengthwise) is 15mm. The bulkhead spacing when mounted is 20mm.

The damper towers on this car are a bit different, although you could say a somewhat similar solution was once seen on the Corally HMX. That’s not really correct though, as the only things similar are that they’re made from aluminium, and how the dampers are mounted to them.
The weight of the towers is 3.4g each for the rear, and 3.1g each for the front.

Front towers on the car, each monted with a 3x5mm screw to the chassis, and a 2x10mm screw to the bulkhead.

Rear towers, which you can see are a bit wider. Overall, the towers front and rear sit very low.

On the MTC1, the gear differential was already a standout feature in how beautifully made it was.
The MTC2 gets a completely new diff (although I believe the bevel gears are still the same as the latest revision for the MTC1), and it’s even more beautiful!
The precision of the parts and how it is constructed makes it a joy to assemble, with no more pins and flimsy shims that get coned.
The pulley is no longer a small 35T as on the predecessor, but no a typical 38T size. 6000 weight diff oil is included.
Assembled with the 1.6g of oil specified, the complete diff weighs in at 20.2g.

The front spool is new as well, with the main housing being a single composite parts +pulley flange that pops on.
Aluminium outdrives are screwed in with 3x10mm screws, and assembled the weight is 10.4g, with potential weight savings if lighter screws are used.

A new 20T middle pulley is used (for a 1.9 internal ratio). The composite pulley slides tightly over the spur gear holder, and is secured with two small 2.6mm screws.
The holder houses one 6x10x3mm bearing, and one 5x8x2.5mm bearing, while the spur gear (not included) is secured with four tiny 2x3mm screws.

Front spool, middle pulley with spur gear, and the rear diff – all ready to go in the car.
The middle pulley and spur gear weighs 8.6g – this with the bearings and the Axon spur gear I chose.

The motor mount of the MTC2 is a rather large piece, but still very slim as it is heavily machined with thin material thicknesses used, and surprisingly light at 18.4g. All together one beautiful piece. As you can see, the shaft for the middle pulley is integrated in the motor mount.

Mounted in the middle of the chassis, the motor mount is here fully assembled with the two belt rollers/tensioners, using five small 3x6x2.5mm bearings in total, while two stopper screws are used to make sure the battery won’t rub on the spur gear.
Different weights that fit into to the motor mount are also available separately as option parts, for an easy way to tune the weight balance of the chassis.
The front and rear belts sit as close to the centerline of the car as possible, with each belt to one side of this line. Overall the middle pulley and spur gear is as narrow as possible.

A one-piece upper deck is included with the MTC2, cut from 2.0mm carbon fibre (weight 7.1g).
A two-piece upper deck is available separately, as is a thinner 1.6mm upper deck in the same shape as the original one.

Upper deck on the car, here mounted with four screws front and four rear, as well as one screw behind the spur gear. A small 3x6x2.5mm bearing is also included, and this can be used as an optional way to attach the upper deck to the motor mount. Various positions behind or in front of the spur gear are available for this option, as you can see in the image.
The car uses two 351mm plain Bando belts, while belt ension is adjustable via eccentrics like on almost any TC.

Now onto the upper arms and their brackets.
The upper arm itself is moulded composite, and very light at 3.0g.
The arm is completed with an M4 aluminium turnbuckle and ball joint. Camber is adjusted with a 2mm hex driver, turning the turnbuckle from the inside.
The 2.5mm aluminium upper arm brackets have some caster adjustability built in due to the elognated holes, with the special flat nuts that secure the balls from the underside able to slide slightly forwards or backwards. The adjustment range is 4 or 5 degrees of front caster, and 3 or 4 degrees of “rear caster”.
Roll centre can again be adjusted with spacers under the balls.

Front upper arms and brackets on the car.

The rear upper arms on the car.

The upper arm brackets key into the lower bulkheads (see previous image of bulks to see shape) to make sure they don’t move.

Three roll-bars are included, with two 1.1mm thick bars and one 1.2mm bar. The front and rear of the car uses the same bars. The initial setup used here is 1.1mm front and rear. Obviously the bars are mounted further outboard on the arms compared to most cars.

Roll-bars are monted very low on the chassis, with these super small aluminium holders and 3x6x2.5mm bearings.
Mounting these to the chassis was the only time during this build that I found anything fiddly, as the parts are very small and fastened to the chassis with tiny 2x6mm screws. If I was to build one of these again, I would mount the holders to the chassis much earlier, and then just add the bars once the belts are in place. Once mounted, the roll-bars work really well.

Again, the steering has no carry-over from the MTC1, but is completely new. The basic construction is fairly standard, but there are a few things that stand out. The bearings on the steering arms are spaced quite far from each other, minimising play there. Another thing I noticed is that the arms are quite short at 17mm (centre-to-centre), this obviously to go with the different suspension setup of the car.
Ackermann is adjusted with spacers. A steering stopper is also used, with 6mm stopper spacer included, and 5mm and 5.5mm stopper available.
The steering assembly as you see above weighs 7.1g.

Here you see the steering in the car with everything connected. You can also see the steering stopper below the steering bridge.
A plastic servo horn is included (no servo saver) with inserts to fit different servos. It is also adjustable in length, with three options – 16.5mm, 17.5mm, and 18.5mm (initial setting).

Now it’s time to complete the suspension, starting with the driveshafts.
These are actually the same as on the MTC1, which is no bad thing as those driveshafts are among, if not the best driveshafts I have built.
Rear driveshafts are aluminium with steel wheels axles, while the front gets steel double-joint driveshafts, with alu outer housings. The drive shaft blades are 3.5mm thick. Joint grease is included for the assembly of the driveshafts.
Front driveshaft assembled: 8.8g
Rear driveshaft assembled: 6.1g

Onto the uprights, which are again the same part(s) at all four corners of the car.
The main part of the upright, i.e. the bearing holder, is a minimalistic aluminium part, weighing in at a mere 1.9g each.
When you add the 2.5mm thick aluminium steering arm, or upright lever as it is named by Mugen, the weight together with the screws goes up to 5.1g. The precision between these parts is really good.

Front upright assembly complete, with driveshafts, bearings, and 4.0mm thick wheel hex hubs.
In this image you also see the small 2x6mm screw through the upright just below where the bearings sit. This can be used to remove any play in the bearings within the upright. When the parts are new (on my car), the bearings sit quite tight already, and this is especially true for the inner bearing, where you need to check one extra time to make sure the bearings are pushed it all the way. The result is that the 5x10x4mm wheel bearings spin freely, but without any play. Again, superb precision.
The completed front upright assemblies as you see above weigh 17.5g each.

Rear upright assemblies are very similar to the front, with the exception of alu driveshafts, and 4.5mm thick wheel hex hubs.
The completed rear upright assemblies as you see above weigh 15.0g each.

One completed MTC2 front suspension.
It is again possible to adjust the upper arm position with spacers under the lower and upper outer balls. 6mm balls are used on the upper arms, both for the two inner, and the outer ball.

Body stoppers that sit inside/above the front wheels are included as well with the MTC2. The height of these can be adjusted with spacers under where they are mounted. These have been seen from other manufacturers as well, but as we have become used to by now, Mugen’s solution is by far the most beautiful! The idea of these is that they prevent the body from touching the tyre, allowing you to mount the body low. To allow them to function as intended, you must let the body move up freely on the body posts, which you do by using the body clip in a hole higher than you would normally use.
These minimalistic alu parts weigh 1.1g each.

This is the completed rear suspension of the MTC2, moving super free, but with what feels like very little play. Toe-in is obviously adjustable with the toe-in turnbuckles. By adjusting the mounting angle of this you can also change how the toe angle changes on compression.

An aluminium floating servo mount is used, mounted to the chassis with three screws. Weight 5.9g.

A few things to note in the picture above.
Servo mount now in the car, with included servo mounting hardware. Further back, you see the included tiny fan mount, which allows you to securely mount a fan in front of the motor. Behind that you also see the slot cut into the bottom of the motor mount, which is there to allow you to run the receiver wire from the ESC between the motor and motor mount. A nice touch!
A 20g weight plate that you can place under the receiver is alvailable optionally from Mugen.

Plastic adjustable battery holders are included for a tape-free mounting of any battery. Adjustable in both widh, length and height.
Additionally, there are front two positions (front/rear) available, even for a full size lipo battery. Above you see the holders mounted in the rear position.
It’s also possible to run shorty batteries, with different positions available also for those, as can be seen from the chassis holes.
Special heavy (20g & 52g) battery holders are also available optionally.

Even though the MTC1 dampers were excellent, Mugen have made an effort to further improve their 1/10 TC dampers.
While the dampers still use many of the same parts, some of the key parts like the cylinders, pistons and shafts have been re-done.
The inner mesurements of the cylinders are 11.2mm x 16.25mm. 400 weight oil is included.

Starting from top left, this is how the bladders or diaphragms fit into the cylinder. You also see the small holes through which excess oil can escape when you assemble the dampers.
Next up, you see (although the photo is a bit too light) how the top e-clip fit into a recess on the top of the piston. This means that you build the shafts opposite of how you would normally, with the top clip going on first, then the piston, and finally the lower clip. Just be careful when adding the second clip so you don’t scratch the shaft.
The groove for the top clip is also very close to the end of the shaft. Altogether, this means that the top of the shaft/piston is almost completely flush.
Finally, on the new top caps Mugen have retained the markings, but done it in an easier and more simple way compared to the older dampers, with marks for different oil viscosity etched onto the parts. Still super helpful. The top caps are also super low profile.

Dampers all assembled, with the rear dampers 1mm longer than the fronts, thanks to using different length lower ball joints. The rear dampers are 52.5mm when built according to the manual, and the fronts 51.5mm accordingly.
A pair of 6.25T (medium) and a pair of 6.5T (medium soft) springs are included, with 5.75T (hard), 6T (medium hard) and 6.75T (soft) springs separately available from Mugen. The springs are 20mm long with an inner diameter of 14mm.
These springs were developed for the MTC2 suspension geometry, and are softer than most springs from other manufacturers.
Overall, the MTC2 dampers really impressed me, and are really the best TC dampers I have ever built. Precision and function is perfect, and never has it been so enjoyable to build RC car dampers. Finally a manufacturer has somewhat upped the game on these small dampers!

Dampers on the front of the car, with damper angle adjusted with spacers. The lower damper position can be adjusted by moving the lower holders in/out, as already mentioned.

As is obvious from the pictures, the dampers sit really low on the car, with the special towers making it look even more extreme.
Rear damper positions are adjusted the same way as the front.

Even the front bumper parts are all new with the MTC2.
The plastic bumper is super small and light at 3.0g.
The new foam bumper is quite large, hard and heavy, at 10.9g in standard uncut form.
A 2.0mm thick carbon upper brace is included, which stretches back to meet the front bulkheads to form a solid support, which should prevent crash damage to the chassis.

The bumper assembly completed weighs 23.5g.
The MTC2 uses the same aluminium body height adjusters as the MTC1 did. Although these look very nice and are really light, they are not my favourite part, as I find them a bit fiddly to use.

For the rear, both vertical and horizontal body posts are included. Horizontal body posts is not something I like, so the vertical ones goes on my car. These have a leg rearwards as well, to support the body.
The rear body mounts (whichever you choose) attach to a 3.0mm carbon plate fastened to the rear bulkheads. This means that the rear left and right bulkheads have a support between them, while the front does not. If you want this at the front as well, an upper deck brace is available separately (A2158).

This is what the new MTC2 from Mugen looks like once all assembled, and with some nice spoked (of course…) wheels.


Once again I have been truly impressed by a touring car from Mugen, just like I was after I had built the original MTC1.
Of course the car is quite expensive with a price of around 629 € here in Europe, but when you look at what you get with the kit compared to its competitors, you could still say it’s value for money. The car includes options like ballast weights, body stoppers, extra roll-bar, adjustable alu body holders, flex brace etc. + a very high level of materials used everywhere, so it’s an extremely well equipped car kit. Wheter 600+ € TC kits really is the best way forward for the hobby is another question though…
Personally I really appreciate the fact that it has been designed by someone who clearly has an aspiration and ideas of their own, actually properly thinking things through and trying to find a good and beautiful solution to a problem, instead of just copying. There is an ambition behind the design, which can be seen in most every detail of the car, and it is followed through in production with a proper focus on real quality, fit and finish.
As I mentioned at the start though, what will decide any racing cars fate in the end is always the stopwatch. And against the stopwatch the MTC2 is not yet fully proved. I very much hope that this car is as good on track as it is on the bench though….and that we will all soon have the chance to prove it on track as well.
Hopefully you have found this presentation of the Mugen Seiki MTC2 enjoyable and interesting. Thanks for reading!


Mugen MTC2 Build Coming Soon
Just a note that I finally received my Mugen MTC2 yesterday, so I will be posting a full build article within a few days time.


Mugen MTC2 Box
Looks like we won’t have to wait too long anymore for the new Mugen MTC2.

Picture from R/C Champ in Japan.

Mugen MTC2 Manual & Parts
Below you can find the manual and parts lists for the soon available Mugen MTC2 touring car.
Click images for PDF’s.


New Mugen MTC2 Launched
Mugen Seiki have finally presented the new MTC2 touring car, which is a complete re-design over their previous MTC1.


