Monthly Archives: May 2024

Schumacher Mi9 – Detailed Presentation

Welcome to my full detailed building presentation of the brand new Schumacher Mi9 touring car.
Schumacher have been around for a long time – since 1980 actually, and they are therefore one of the older manufacturers of RC racing cars still around today. They had a successful time in off-road racing in the late 80’s and throughout the 90’s. In 1996 their first touring car was launched, and for the next 10 years or so they had many good race results with these cars.
As the level of TC racing took off, Schumacher had less success over the following period though, especially on an international level. From a personal point I many times thought there were some really clever ideas on their cars, but they seemed to be not fully developed and refined.
While their off-road program got stronger already many years ago now, their on-road program has taken some clearly noticeable steps forward through the last few years. This was clearly visible in big race results as well, and since the start of the Mi9 project they have been really strong, leading up to the last year where they have totally dominated modified TC racing with their star driver Michal Orlowski.
If you have followed international TC racing lately, the step change in competitiveness with the Mi9 prototype will have been quite obvious. This lead to a constantly rising interest in the car, but Schumacher made us wait all the way until now – May 2024, for the car to be released. All together this makes the Mi9 probably the most eagerly awaited TC release for a very long time.
So what better reason to take a closer look!?
Especially as I found out that it is almost exactly 30 years since my first Schumacher RC car!

The Mi9 comes in a fairly normal size TC kit box.
Actually it’s a plain white box, but with a printed Mi9 specific cover that slides over the box itself.

The back side of the cover features a description of the Mi9.
Schumacher could have made a better job of making the ‘box art’ more exiting as I think it’s a bit dull, but I imagine that’s not very high on the list of priorities. 🙂

Kit contents, with everything packed in separate bags containing everything you need for that build step. Makes the build very organised and mostly easy and joyful.

Schumacher still includes a high quality printed manual – and a very good one, containing a lot of very good set-up help, set-up sheets etc. This is the way it should be with every racing kit. Thank you Schumacher!
A Mi9 specific black/white decal sheet is included with the car.

Today possibly even rarer than the printed manual is the fact that Schumacher includes everything you need for the build when it comes to fluilds, like diff and damper oil, thread lock and moly grease. Great!
Two simple tools are included as well.
The only minus is the damper oil bottle, which with it’s large opening makes pouring thin oil a bit messy. A bottle like for the diff oil or thread lock would be much better.

The Mi9 is available in two versions – a carbon fibre version and an alu chassis version. Between these two versions, obviously the lower deck is different, but also the upper deck, with the carbon car using a one-piece upper deck while the alu car comes with a split type two-piece upper deck.
My car is obviously the carbon fibre version, as I will be mostly running on low- to medium-grip asphalt.
The carbon chassis itself is actually not a new part, but the same that was included with the Mi8 HGT conversion, which was available for Schumacher’s previous TC – the Mi8.
It’s cut from what Schumacher calls ‘soft weave’ carbon fibre, 2.25mm thick, 85mm wide, and weighs 71 grams.

The first actual build step is to secure the motor mount to the lower deck.
The motor mount is one-piece, black anodised, and has a very 3D shape, in that it has material removed everywhere possible.

Here it’s pictured from beneath, trying to show the 3D shape, but also the two locating pins which key into the chassis.
In addition it’s possible to use up to four screws, and by playing around with which screws you use it’s possible to adjust flex in this area.

The motor mount weighs 18.5g and has an overall length of 80mm. It locates the motor 7.5mm from the centerline of the chassis.
The pockets under the motor and on the opposite side of the chassis have 1mm of material removed.

In the same build step as the motor mount, you also mount the lower bulkheads to the chassis.
All four bulkheads are the same. These again have some material removed to make them lighter.
While they are also black anodised, the finish is a bit duller compared to the motor mount, so this would indicate that the aluminium quality used for the bulkheads is harder compared to the motor mount.
As can be seen in the photo above, they feature two screws and two pins that go onto the chassis.
The bulkheads weigh 7.1g each. The lengthwise distance between the pins is 23mm, while the screws are 14mm apart.

The pins (both bulkhead and motor mount) fit very precisely into the chassis, and this level of precision in tolerances is very impressive.
The bulkheads are machined from 5.5mm material, and not 5.0mm which would be used on most cars. The distance between the inner side of the bulkheads is 17.5mm, and therefore 28.5mm measured from the outside, giving a 23mm screw hole spacing.
Each bulkhead also has a holder machined for the roll bar bearings, as well as clear markings for the diff bearing holder eccentrics.
Optional ‘high’ bulkheads are available which place the diff 2mm higher, and these seem quite popular with Schumacher team drivers.

Now it’s time to move onto the assembly of the rear gear differential, which is a new design from Schumacher. Reading the product presentation it’s clear that this is an area they have focused on for the Mi9. As the differential is a super critical part in a well working TC, it’s no surprise to see the focus here, as getting it right will have very positive effects on handling.
New for the Mi9 is the use of small 6x10x3mm diff bearings, which is an obvious way to make a more compact and lightweight design. Time will tell how well the smaller bearings hold up here. But of course they’re not the first to use these smaller bearings.
The bevel gears inside the diff are not new (18T/10T), but they sit on new hollow steel output shafts (2.1g), which in turn rides on 5x5x2.5mm bearings inside the diff.

The outdrives are steel and secured with a 1.5mm pin and o-ring. This means that the outdrives can be exchanged without opening the diff.
5000 weight silicone oil is included with the car, with the manual recommending 1.6 grams of oil to be used.
The diff (and spool) uses a 40T pulley size which today is quite unusual and gives them a larger diameter compared to most other cars.
Schumacher says that it is a “lightweight gear differential design with ultra-smooth action, improved performance and ease of build”. The diff was really easy to build, and once assembled it is indeed very smooth. The diff weighs 22.1g, but this is with the diff bearings. I never weighed it without those, but checking other 6×10 bearings, these were 0.7g each, so the bearing-less diff weight should be 20.7g.

The spool assembly consists of a new lightweight 2.2g spool hub, the same 6x10x3mm bearings, steel outdrives (2.0g each) and a new 40T pulley.

Once assembled, the spool weighs 12.4g with the bearings, which would be 11g without them.
I must say that this is a very pretty part of the Mi9 design! 🙂

The spool and diff is held with these bearing holder eccentrics, with which you can set the diff/spool either in a high or low position, as well as adjust the front/rear belt tension. The kit setting for the diff/spool is in the high position.
They are made from plastic, with optional alu parts available, also 0.5mm offset versions to further adjust diff height.

The middle pulley and spur gear parts pictured.
These consists of a 22T pulley + flange (4.5g), a 48P 85T Arrowmax spur gear, steel layshaft, unusual inch size 3/16″ x 5/16″ bearings (one flanged) and special spur gear screws.
Any industry standard spur gear which has holes for a three screw attachment should be suitable here.
The 22T pulley size is again unusual, and give an internal ratio of 1.818.

Layshaft fitted, with a slot in the motor mount making for an easy assembly.

The weight of the spur gear assembly is 10.4g.

Rear belt and diff in the car.
Because of the larger pulleys, the Mi9 uses longer belts compared to all other mid-spur touring cars.

Front belt and spool mounted.
The 119T / 357mm belts are made by MBL, or Mitsuboshi which is their full name.

The drivetrain in this car is super free, which is of course the intension with using larger than normal pulleys. The free drivetrain will also have something to do with not having any extra belt tensioners, which is in turn made possible by the use of large pulleys.
It’s of course impossible to know how well this all works before running the car, but as the car is well tested and this configuration was already used on their previous car, there’s not really need to doubt it.

Next we move onto the towers for the dampers.
These are simple and very small brackets on the Mi9, made from 3mm thick carbon fibre, and quite traditional in that sense as many cars have moved to bulkhead and/or chassis mounted alu towers.
I’m not sure what I prefer, but simple carbon towers is to me an elegant solution. I’m sure this is an area which can have quite a big effect on the car though.
The rear tower weighs 2.3g, while the split front tower is 2.0g only.

The towers mount to the car with one screw and one pin for each bulkhead, but in addition there is a groove in the bulkheads which the lower part of the towers also fit into. So it’s a simple and light assembly, but at the same time very robust.

Each tower has only two positions for the upper damper mount.
The use of a split front tower and how it is realised is curious, but as flex in this area is something that has been explored by many manufacturers in recent years, it’s no doubt a choice made from findings on the track during testing.
Schumacher’s description in their product presentation states “front split shock mount design offers a smooth handling characteristic”.

Like previously mentioned in this article, the carbon car comes with a one-piece top deck. This is again the same part as on the Mi8 HGT. The alu car comes with a two-piece top deck. These are available separately of course, with the two-piece decks available in a 2mm carbon fibre, and a 1.6mm S2 material version.
The one-piece top deck here is 2.0mm thick and weighs 8.2g.

Here the upper deck is in the car, mounted with two screws per bulkhead and one screw and bushing in the motor mount behind the spur gear. Two screw positions are available here, with one having a slot that allows sideways movement for more flex.

After the top deck it’s time to mount the upper link mounts that hold down the diff/spool and to which the upper arms attach.
The front ones are the same left/right, while the rear ones are different left to right due to the extra machining for clearance.
On many cars these parts would be aluminium, with one reason being that you can make proper threads in alu, and with the upper arm balls attached to these plates, having threads makes life much easier when working on the car. Schumacher solve this with threaded metal inserts, which are pressed into the carbon fibre plates. A solution which works well.

The upper link mount also acts as holders for the rear body posts. A unique solution. Because of this the rear plates are 4mm thick, and weigh 3.5g each.
If you want to adjust upper arm length, optional parts are available front and rear which allows for a 1mm longer upper arm.

The front mount is 3.0mm thick and weighs 1.5g.
The plates front and rear are fastened with two screws and two pins in each bulkhead, making for a really solid construction.
The ball studs used here are steel with a 4.3mm diameter. Upper arm height can be adjusted with spacers.

Lower suspension arms are up next, and when developing the Mi9 a lot of time and effort was spent on the all new suspension.
Above you see all the parts for the lower arms, with a front arm on the left side and rear arm on the right. The difference between these is in the carbon arm and where the damper mount is positioned. The rest of the parts are the same F&R, but all new for the Mi9.
Starting from the inside, new 5.5mm balls and sockets are used, held in place with o-rings. A threaded metal insert is pressed into the carbon arm, into which a (pre-thread-locked) set screws with rounded ends go for droop control.
The lower damper and roll bar mounts are plastic – lightweight but solid due to the way they have been designed and key into the carbon arms. Optional alu damper mounts are available, but always consider that you add weight and perhaps more importantly take away a bit of flex/forgiveness if you change from plastic, and it is (pehaps) good to have some plastic in the suspension if you want to have a forgiving car.
Outer pivot balls and sockets are also new for the Mi9.

The arms have a simple shape and front and rear arms are very similar, and time has no doubt been spent refining the shape to acheive the desired flex / stiffness. Left and right arms are interchangeable.
They are all cut from 3.0mm carbon.

Complete front arms weigh 9.3g, with a pivot-to-pivot length of 60mm.
For the front end, the manual calls for 1mm under the rear inner suspension balls, with 0.5mm under the front, for a kit setup with a bit of anti-dive.

Complete rear arms weigh 9.1g, with a length of 59mm.
There is really a minimal amount of play once the arms are fitted to the car, and it all feels very smooth. Very well executed by Schumacher.
For the rear the kit setup is 1mm under each inner suspension ball.

The Mi9 gets all new driveshafts, with a totally revised design.
As you can see above, the driveshafts consist of many beautiful parts. On top you see the parts for one rear driveshaft, while the double joint driveshaft underneath is for front of the Mi9.
In terms of level of detail and finish, these driveshafts really are a step above most, but not all is positive. More on that soon.
Here some data on the driveshafts and parts:
– front shaft 2.4g and 47.5mm (end to end)
– front (hollow) wheel axle 1.8g and 25mm
– front DJ cage 1.2g
– front complete driveshaft 7.8g and 71mm (end-to-end)
– rear shaft 2.4g and 48mm
– rear axle 2.2g and 24mm
– rear complete driveshaft 6.4g and 69.5mm
– inner (outdrive) bearings 1.5x4x2mm

…And four hours later when the driveshafts are finally assembled… 🤦♂️
These driveshafts are really beautiful to look at, and I would guess that Schumacher have found quite a bit of performance in this area with such precision driveshafts. They really seem to work well when built Which is of course all positive.
However, they still made me (and many others who have already contacted me) quite frustrated. Part of the 4h mentioned was a trip to buy some suitable small circlip pliers for the spring clip that hold the driveshafts together, and part of the time was spent before I realised that “yes, those are definitely needed”.
To Schumacher’s defense, this is mentioned in the manual, but really this tool should then be included. Or much better, design it in such a way that it is not a pain to build, or at least supply them pre-built.
With the right tool, the fronts went together OK, while the rears were still a struggle. I’m also surprised that no spare spring clips are included.
Then comes the next frustration in the form of the small 1.5x4mm bearings and M1.2 e-clips. I already wrote in a previous build presentation how I feel about those, and nothing changed with this build. In the meantime I also built one car that uses bearings that are 2x5mm and the e-clips are M1.5, and the experience was so much better.
For the customer, it’s not a good experience to buy a 750 EUR kit and then meet frustration like this while building. If one did not have the experience of building probably over 100 kits during 35 years already, I can imagine the situation would be even more upsetting.
I know many will say “yes, but the performance is much better”, but that’s a very simplistic view to me. These cars are consumer products, not cars for professional race teams with mechanics.
Imagine fighting with this when you are enjoyng your race day, having just marshalled, and have just 30 min until your next race.
I of course understand that professional RC race teams find improvements in these things, and that this info then filters down to average racers, who in turn thinks this is the next “must-have”, and then it can become “a trend” that needs to be on the cars to get hyped and sell. But the manufacturers need to be responsible and refine a design until it’s user friendly before they sell it. That’s my opinion.
Sorry for wall of text – I just think it’s a shame when the Mi9 build experience went so well until this point.

Next is an important part of the all-new suspension – the new upright or hub carrier design.
This is a two-piece design with a plastic hub which I think is really beautiful, and carbon steering arms that mount to the bottom of the hub.
The hubs are optionally available in aluminium as well, but like I mentioned previously, keep in mind that those will have an effect on performance and/or characteristics.

Above, you see all the parts for one upright assembly.
Starting from left we have an o-ring that secures the hex axle to the driveshaft, a super light hex axle (0.8g) with a narrow 2.65mm wide hex part, 6x10x3mm wheel bearing, plastic hub (2.5g), bearing spacer, another wheel bearing, and the driveshaft.
Below that we have the carbon steering arm (1.4g – 3.0mm thick). This is mounted to the plastic hub with two M3x8 screws, while a threaded insert is pressed into the carbon. This where the outer arm pivot ball is later attached. For the steering link a a ball stud is secured with a nut. Two positions are available in the arm, while bump steer is adjusted with spacers (0.5mm kit setting).
Again, precision in all these parts is excellent.

These assemblies are the same on all for corners, with the exception of the carbon steering arms which are different front and rear.
Above you see the threaded insert in the carbon steering arm, to which the outer ball stud mounts later.
The whole upright assembly weighs 16.6g front and 15.2g rear.

Onto the upper arms, which on the Mi9 are of the double turnbuckle type.
These use black anodised alu turnbuckles, and new upper link sockets. From what I see, these appear similar to what was used on the Mi9, but with a different material being used.
Front upper arms (complete) weigh 4.7g. An M3x8 screw is used as a body stopper up front and thread into special link pivot screws that connect the two parts of the upper arms.

The rear upper arms are the same as at the front, with the exception of the link pivot screws as there is no body stopper screws here. Weight for one upper rear arm is 4.1g.
Double turnbuckle type upper arms have never been my favourite, as they require a lot of set-up work and checks to make sure the camber and caster angles are correct, and stay that way. However, flex is very important in this area, and I can see that this is one way to acheive the desired flex here.
Once assembled, the whole suspension feels very good – free, but with minimal amounts of play.
The weight of the complete front suspension (lower and upper arms, uprights, driveshafts, steerings links etc.) is 32.4g. For the rear 30.1g.
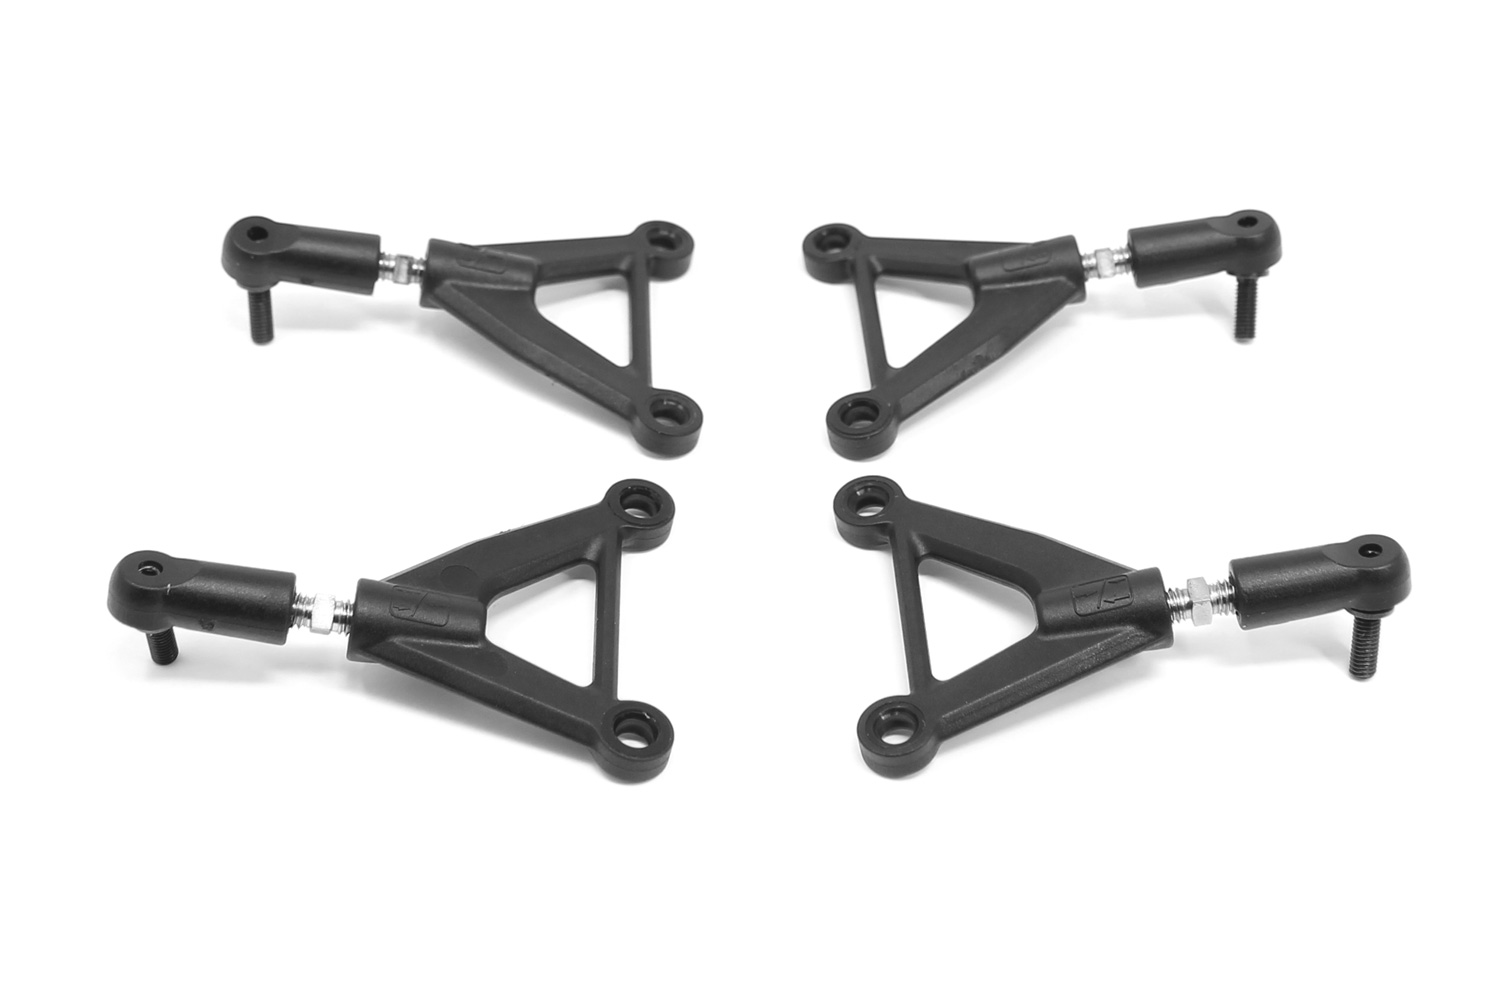
Very positive is that Schumacher also includes their “Upper Wishbone Conversion” from the Mi8.
Performance will probably not be as good, but they should require less work in setting and checking the car. And by including both types the users can choose what suits them better.
These arms are the same an all four corners, with the plastic arm 2.5g, the M4 steel turnbuckle 1.7g, and the whole upper arm assembly 5.6g.
Weight could of course be saved with a titanium or aluminium turnbuckle. But this type of upper arm will also affect the suspension flex, and therefore the handling of the car.

The steering system in the Mi9 is a conventional dual bellcrank setup, riding on 4x8x3mm ball bearings and mounted to alu steering posts.
The bellcranks are plastic and 17mm (centre-to-centre), with alu arms available optionally. The steering bridge is aluminium, with a 8mm distance between the ball studs.
Small grub screws are used as adjustable lock stops to set max steering travel.

Steering in the car, steering links attached.
So far the steering feels solid and play free. But as always, it’s only after use you can tell more.
Ackermann adjustments can be done with the two holes on the outer upright steering arms, but spacers can also be used where the ball studs mount to the steering bridge.

Perhaps the most beutiful single part of the Mi 9 is this one-piece floating servo mount.
The shape is quite complex as it wraps around the steering post to put the mounting point quite forward in the chassis. It uses two pins and two screws for this. The weight is 8.0g.
A special direct mount AEROX MP1 brushless servo is available from Schumacher as well.

23T and 25T plastic servo horns are included.

Countersunk washers included for mounting the servo.
Even if it looks slim, the servo mount is really solid when mounted in the car.

The servo mount looks beautiful in the car as well!

With the steering assembly done, it’s time to move to the anti-roll bars.
The roll bar design is the same front and rear, with a 1.3mm bar included for the front, and 1.2mm bar for the rear. These go between the suspension arms and driveshafts, and are connected to the arm via super short drop links. All quite conventional.

The anti-roll bars ride on 1/8″ x 1/4″ ball bearings and alu clamps.
The way these clamps are designed together with the limited access to the bearing holder holes low on the bulkheads makes assembling and adjusting the roll bars unnecessarily finicky.

The new “Nano” dampers are an almost all-new design, with just a couple of minor carry-over parts. These are 7.6mm shorter than Schumacher’s previous design, which is a huge cut in length.
The cylinder has an inner diameter of 11.2mm, which is fairly standard among many cars today. The depth is 12.6mm, but there is a “pocket” of 1.3mm which the diaphragm drops into, so the effective depth is 11.3mm. Kashima coated cylinders are available as option parts.
The ti coated piston rod is 16.2mm long, and the 4-hole piston is screwed onto the rod with a small M2x6 screw. The new diaphragm is really super soft, while the upper sockets are also new, and has a hole already made, so no need to drill them yourself.
The top alu ring is super low, and like throughout this damper design Schumacher have really gone all-in on shortening the dampers as much as possible.
Springs included are from the CORE RC Hi Response range and 19mm long. The included front springs are orange C2.7, while the rear springs are black C2.6.

The dampers are built with 8mm stroke length, which is really (close to) the minimum possible with the ride height and down travel needed on these cars. That’s why you see all the effort in shortening other parts of the dampers. Overall damper length is a mere 44mm! Weight is 7.5g.
You could expect such extremely short dampers to be difficult to build, but it turned out to be quite easy and straightforward to get all four damper built so they feel and work the same. Once built the dampers also feel very good in that they are really smooth.

The upper damper mount balls are new and made from aluminium. They have a pin that go into the other hole on the tower (towers only have two holes) while a screw mount them securely to the towers. When changing damper angle you just turn the pin and screw around. Still, because of the limited space it’s not all that easy to do quickly.
Because they’re aluminium these new upper balls are really lightweight. The lower damper mount balls are also new and use a 3mm hex .

Battery mount parts are all plastic and light. They’re adustable in every way, with parts for different height batteries included. For battery width and position you can use different spacers on the inner stoppers, while the hooks of the battery mount slide sidways to adjust to your battery.
Length adjustments are made with screws in the battery posts. There are holes in the chassis for both normal stick pack and shorty size batteries. In the photos you see it set up for shorty packs.

The front bumper is a carryover part from the Mi8, and it consists of a lower plastic bumper (8.1g), foam bumper (8.6g), upper plastic bumper plate (3.0g), as well as body posts and an upper carbon crash brace. This is specific for the Mi9 and rests against the front bulkheads to give further crash protection.

The fully assembled front bumper (with suitably cut posts) weighs 26.1g.
Three different types of body hangers (the body supports on the posts) are included, and they let you adjust the body height in fine steps of 1.2mm. These mount to the body posts with pins.
Not seen here are the included angled body clips.

This is what the bumper looks on the car. It all feels very solid.

The rear body posts are the same as at the front, but of course mounted in a unusual way to the rear upper link mounts which are extended to locate the body posts really close to the rear wheels.
It’s also curious to see how they only offer vertical rear body posts – as it’s only a couple of years since many seemed to consider horisontal posts a must! But of course they’re not the only winning team lately to use vertical body posts again.
Considering the design, I would assume Schumacher have found some performance by the unique rear body mounting solution with today’s high downforce bodies. In the presentation they just state – “Independent rear body mounting. Providing better handling performance and durability”.

With that done, the assembly of the eagerly anticipated Schumacher Mi9 kit is finished.
As you see the chassis in these photos, it weighs 461 grams. This is almost exactly the same as the Axon TC10/3 I built recently which was 463g.

Time for a summary of the Schumacher Mi9 then.
The overall impression of the car is that it feels really refined, and it is obvious that a lot of time has been spent developing this into a super competitive touring car. Everywhere the fit and finish and tolerances are to a very high standard.
Personally, I must say I have really enjoyed watching Schumacher’s comeback durling the last couple of years, as you can see from their products that they have found a new level. My impression from the outside is that on the on-road side this has to some extent coincided with the arrival of Andy Murray as designer of their cars – the first step change seen with the 12th cars and now with the last couple of touring cars. That’s probably a too simplistic way of looking at it though, as there is more than one person needed for progress like that. Either way, it’s good to see one of the old school European manufacturers making such a strong comeback and going about it in the right way.
You can see (or at least you imagine you can!) where the performance comes from with the Mi9, as all the key parts seem really well executed (from a performance point). You have the super free and light drivetrain, smooth differential, really precise and light drive shafts, play free as well as light suspension with geometry refined over time, coupled to super short and smooth dampers. This all is then mounted to a well known and tested structure where flex points have been figured out, forming a very low CG and competitive touring car.
On a couple of points I personally think the focus has been too much on performance, and not enough on user-friendliness. By that I don’t mean they should cut back on performance, but rather add some more attention on the user-friendliness. But I already wrote down why I think that.
Another positive is the manual and documentation included with the car, and especially the set-up help provided both in text and with plenty of set-up sheets for various conditions.
Overall it was really interesting to finally build this car which has won most everything in the last year, and I can’t wait to see how they do in the upcoming races leading up to the ISTC World Championship later in the year. It will also be fascinating to follow how this car is developed even further.
On a personal level, I can’t wait to run the car!
More content on the Mi9 will follow as electronics arrive to install in the car, and then later testing of the car. For now though, I leave you with these photos of the fully built Mi9 touring car kit.
As always, do let me know if you find mistakes. Thanks for reading! 🙏


Schumacher Mi9 Build Upcoming

Next on my workbench!
The Schumacher Mi9 arrived today, so you can expect a full build presentation of this interesting new TC sometime soon.
Taking all the necessary photos and writing everything down takes quite some time though, and spring is busy anyway, so it will take a while before it’s ready to be published.


TRF421 Interviews @ Shizuoka 2024

As I mentioned in posts yesterday, this week the 62nd Shizuoka Hobby Show is held in Japan, and Tamiya is displaying the new TRF421 Chassis Kit for the first time on their domestic market.
This brings some good content on the car, even if it’s in Japanese, and today I came across these two interviews about the TRF421 with designer Takauki Kono.
These interviews give a lot of background information on the development and reasons for making the TRF421 the way it is, as well as information on what we can expect in the future.
__________________________________________________________________________________
The first one from RD2 magazine, and I post a translation of the original interview here.
The Rajitsu editorial team asked the manufacturer!
Extra Edition ‘Tamiya TRF421
The TRF421, which finally appeared with a brand new platform after a 2 year interval from the TRF420X, seems to have been renewed not only in the suspension shape but also in all other areas. What is the background to the full model change?
First, Tamiya’s high-end models are symbolic, so it is our premise that we will continue to produce them without interruption. However, if the model cycle were to be renewed every year, as is the case with other companies, we wondered whether users would be willing to buy a kit priced at 100,000 yen every year due to various cost increases. This was the question we had to answer. Furthermore, once a platform has been created, we and our users will get closer to a situation where they ‘understand the machine’ by running it a lot, but it takes time, not months but years, to get close to that situation, especially if major changes are made. I think it takes time, especially when major changes are made. The 420X is an evolution model of the 420, so I feel that 420 users can also enjoy a new riding feeling with the new parts. The 420 platform has been enjoyed by so many users that it’s time for the manufacturer to make a new offer. So we decided on a brand new configuration.
I see. Once a platform has been created, there is room for it to evolve based on understanding, which is why the model cycle is longer, isn’t it? It’s a great policy, because it’s a very welcome situation for users to be able to enjoy what they’ve got for a long time!
Unlike previous suspension systems, the TRF421 uses a global-standard upper and lower A-arm type suspension system with a pipod, and incorporates a number of similar configurations and mechanisms to other companies, such as one-touch exchange spur gears, but what was the development concept behind the TRF421? What was the concept behind the development?
In reviewing the platform from scratch this time, we of course checked the prototype touring cars running in competitions around the world and the models that have gone on to become commercial products. I am aware that there have been many trials and tribulations, including many bizarre ideas and structures in pursuit of performance. In the midst of all this, I combined each element to find what I thought was the best shape, while comparing it with the shortcomings I felt during the development of the previous model. The result is the TRF421.
We will continue to incorporate the good points of other companies’ models as long as they will result in a good product. I am aware that immediately after the launch of this car, there was talk that it was similar to other companies‘ cars, but I am confident that I have designed this car with the optimum configuration for the driving image I want to achieve, so I hope that you will take it in your hands and feel whether this car is a copy of other companies’ touring cars or not.
I see. Even if it looks similar, how will it function as a car? So you always had this in mind when designing the car. In that sense, it is true that the front, rear, upper and lower A-arms are made of resin material, not the usual carbon material, and the upper A-arms seem to have been designed to be quite slender when you look at the real thing. Can you tell us why this configuration was chosen?
Firstly, we identified the points where we were dissatisfied with the I-arm suspension on the 420X: with the I-arm type, the upper arm is inevitably a single arm, which is not as rigid as the lower arm. Furthermore, the lack of rigidity made it impossible to extend the suspension length any further. Therefore, during development, we of course tested an upper arm with multiple turnbuckle arms, but this not only made adjustment more difficult, but also did not work to our advantage in terms of weight. So the first point was to secure the missing rigidity by changing from the situation where it was originally possible to run with just one I-arm to an A-type upper arm. However, it was still possible to drive with I-arms and we wanted a bit more rigidity, so we pursued the thinness and lightness of the upper arm just enough to secure the required rigidity. That’s why it looks so thin.
Next, for the lower arm, we are aware that other touring cars use carbon material, but in our testing we found that we could achieve the same performance with resin, so we used resin, and to be honest, we consider this lower arm to be a consumable item. We also chose to use resin to keep the price of aftermarket parts down.
The suspension works by the combination of upper and lower arms, so it is good if the desired strength and rigidity can be secured during the operation. We also wanted to increase the length of the suspension a little more, which we were able to achieve with this configuration. The drivetrain parts have also been renewed accordingly.
I see. The points you wanted to improve on the previous model were clear, so the layout was found to improve those points, and the shape and materials of each part were also considered for continued use. Incidentally, in the drivetrain area, it is common to see kits from other manufacturers with diff covers fitted, but this model does not have a diff cover?
Yes, it does. It is bare. This is because if there is a cover, there is no place for foreign objects to escape when they come close to the diff, and with this structure, rigidity and strength can be secured without having to connect the left and right blocks with covers. After all, it is advantageous for a touring car to be as light as possible.
Even a small amount of weight can become a big thing if it is piled up. It is also very interesting to hear about the escape routes for foreign substances. If they get in, they can lead to damage, as they are not sealed.
Next, the 420X came with two types of chassis, but this time only a carbon chassis is included.
We know that there were a lot of opinions about including two types of chassis in the previous model, and we thought it would be a good idea to include two types if possible, but in terms of keeping the kit price down, only one chassis is still a realistic answer.
So, should aluminium or carbon be the standard? As a developer, my interpretation is that there are at most 10 to 20 situations where an aluminium chassis is required, out of a total of 100 driving opportunities. In many situations, we decided to use a carbon chassis because we believe it will allow us to exploit the potential of this model.
However, we decided to include two types of upper decks in the package, as this would reduce the number of options available. The running characteristics of the one-piece and separate types are very different, so by using them differently, we assume that about half of the situations we mentioned earlier, where you want an aluminium chassis for 10 or 20 runs, can be handled by selecting the upper deck.
Thank you very much for your very interesting talk. Incidentally, since you mentioned the upper deck, I would like to ask you about the driving characteristics of the TRF420. Is this the same concept for the TRF421?
Yes, the TRF421 is designed based on exactly the same concept. The chassis is one of the elements that create flex. However, if you just let go, you won’t be able to move forward, so the question is how much flex? The idea of the upper deck is to adjust the amount of flex. Basically, the TRF421 was developed based on the concept of ‘easy, straight running’. You could say that all the elements have been prepared for this purpose. Therefore, as designers, we have developed the TRF421 with the assumption that it would be a one-piece type with a bridge on top of the chassis, but we have prepared a separate type because it is true that some users want the TRF421 to move more quickly. We hope that by first driving with the one-piece type, you will get a better understanding of the basic characteristics of this vehicle.
The concept of ‘easy, straight driving’ gives the impression of being very easy to manoeuvre, but it is also true that there are people who want the car to turn more. It is also true that there are people who want the car to turn more, so being able to adjust the upper deck is a very good trial!
I’ve heard so far, but this is the kind of car I want to make! I understand that each element has been combined to achieve this, but I honestly feel that there are no points that are unique to the TRF421! Please tell us if there are any points that you think are clearly different from other companies.
This also depends on how you think about it, but I also think that bizarre structures and ideas are a wonderful trial, but I think they are risky as a means of ensuring the realisation of an ideal.
I think it’s because Tamiya is a manufacturer, but also because people of various levels of performance stability want to drive a high-end model! My view is that the components should be basically conservative.
The TRF421 features a stabiliser. The installation method is also unique, and I asked the factory to manufacture a stabiliser that would give the performance I wanted with the installation method I used this time. The factory that manufactures the stabilisers told us, ‘That’s impossible! but we managed to make it happen. To be honest, this is a stabiliser made of a material that is unique in my opinion, and is a major component of the TRF421’s performance, so I hope that you will first assemble it according to the values in the manual to get a feel for how it feels.
It’s equipped with such an amazing stabiliser! That alone makes me want to try running it. Incidentally, you mentioned ‘following the instructions’, but is it important to first follow the values in the instructions for the kit you have developed, and not just for this?
This is also from the point of view of the designers and developers, but this model is a particularly high-end model, so we have made no compromises at all with the setting values for each individual part and each section. We have done a lot of test runs and tried many prototype parts. As a result, we have chosen the parts that make this machine run best, and we have developed the settings for each part. Of course, we don’t say that changes are not necessary because the user has his or her own preferences, but we would like you to build the machine as described in the manual and run it to get a feel for the standards. If you can then give us your feedback, it would be valuable information for the next model.
I see. Knowing the standards is important no matter what you are working on, isn’t it?
In that case, it seems to me that the new model will also be a long-life-cycle model, what do you think?
As I said at the beginning, we have just created a brand new model, so first of all, I want to spend a lot of time getting to know this machine and its users. Then we will develop the Evolution model, so that people can enjoy this model even more.
So, I think that the basic parts of one model will continue in the same form for three to four years, approximately. We are assuming at the moment that the basic parts of one model will remain the same for three to four years. Of course, if circumstances change, it may be earlier or later.
As a business, there will be various circumstances, but if it is a model with a long life cycle, it will be easier for users to think about picking one up. It makes it easier for them to think about it.
We’ve heard a lot about the TRF421 so far, but can you tell us at the end what kind of user you have in mind for the TRF421?
Tamiya is not a works-based racing manufacturer, but as a designer, we honestly want to pursue the most advanced performance, and we are proud that the TRF421 is a model that is not inferior to any of our competitors.
That is why we have developed this model to be available not only to Tamiya model enthusiasts all over the world, but also to all users of competitive touring cars. This is also true for the shape of the rear body post,
It has been newly designed in a way that allows both the use of Tamiya bodies and the use of competition bodies.
This is a model that we are confidently sending out to all touring car users.
Thank you for telling us that you are really confident about this TRF421.
We look forward to the next model!
The TRF421 is now in the phase of being delivered to you, so we are developing the next machine one after another. Please look forward to it.
Thank you very much for talking to us so far and we look forward to the launch of the TRF421!
Thank you very much!

The second interview/presentation about the TRF421 is in video format, by the excellent SudapyonRC youtube channel.
Use translated automated subtitles to understand what they are talking about.
Finally, a few more detail photos of TRF421 diff and spool, front and rear drive shafts, as well as the new Ultra Short Big Bore TRF USBB dampers.


Souta Goto TRF421 from TITC 2024.


Videos from Shizuoka Hobby Show ’24

Here is a video showing the Tamiya RC items on show at the 2024 Shizuoka Hobby Show, with Satoshi Maezumi walking us through the Tamiya booth on his Paisen RC Youtube channel.
Included more footage of the TRF421, with Souta Goto also explaining a few things about his TITC TRF421.
And here another couple of videos from the Shizuoka Hobby Show 2024.

TRF421 @ Shizuoka Hobby Show 2024

The 62nd Shizuoka Hobby Show is open from today, and Tamiya displays the TRF421 publicly in Japan for the first time.
Above you see Souta Goto’s modified class 7th place car from TITC 2024.

Here the production TRF421 chassis kit. Note rear body post extensions for vertical rear body mount.

Photo #3 is of a partly assembled TRF421 with info on various parts and changes from the previous car.
* Post updated with further photos from Shizuoka here below *

More details of Souta Goto’s TRF421 from TITC.

Photo showing the bottom of the chassis. Note just one regular motor mount screw.

Below a first look into the new TRF USBB dampers, showing the new upper seals which now sits recessed in the damper body.

